1.6.
qmake, Project Files, and Makefile
| ||
|---|---|---|
 | Chapter 1. C++ Introduction |  |
1.6.
qmake, Project Files, and Makefile
| ||
|---|---|---|
| | Chapter 1. C++ Introduction | |
[ fromfile: qmake.xml id: qmake ]
C++ applications are generally composed of many source files, header files, and external libraries. During the normal course of project development, source files and libraries get added, changed, or removed. To build an executable that reflects the current state of the project, such changes require all affected files to be compiled and the resulting object files to be properly linked. This changing-rebuilding process typically happens many times.
Keeping track of all the parts of such a project requires a mechanism that precisely specifies the input files involved, the tools needed to build, the intermediate targets and their dependencies, and the final executable target.
The most widely used utility for handling the job of building a project is make.[12]
make reads the details of the project specifications and the instructions for the compiler from a Makefile, which resembles a shell script but contains (at a minimum)
Rules for building certain kinds of files (e.g., to get a .o file from a .cpp file, you must run gcc -c on the .cpp file)
Sources and Headers lists that contain the names of all source and header files needed by the project
Targets that specify which executables (or libraries) must be built
Dependencies that list which targets need to be rebuilt when certain files get changed
The make command, by default, loads the file named Makefile from your current working directory and performs the specified build steps (compiling and linking).
The immediate benefit of using make is that it recompiles only the files that have changed or are affected by any changes, rather than blindly recompiling every source file every time.
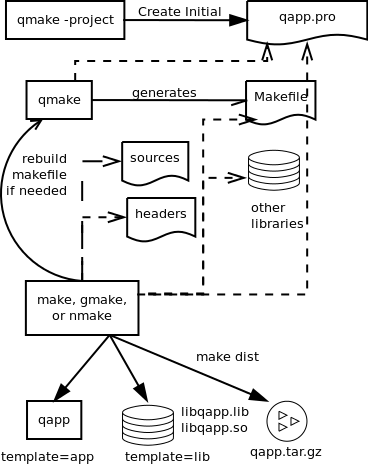
Figure 1.1 shows the steps involved in building a Qt application.
With Qt, it is not necessary for the programmer to write Makefiles.
Qt provides a tool called qmake to generate Makefiles for you.
It is still necessary to somehow run make and understand its output.
Most IDEs run make (or something similar) at the click of a button and either display or filter its output.
To create a Makefile, qmake requires a project file.
A project file describes the project by listing all of the other files, and all the options and file locations, that are needed to build the project.
It is much simpler than a Makefile and can easily be created by the user.
It is much simpler than a Makefile and, although a programmer can easily create one, qmake can also generate a simple project file with the command qmake -project
When this command is issued, qmake lists all source files (*.cpp) in the current working directory as SOURCES and all header files (*.h) in that directory as HEADERS. The resulting project file will be given the name that follows the optional -o switch. If that switch and its argument are not present, qmake uses the name of the current working directory to name the project file and also, eventually, the executable file.
After the project file has been created,
the command qmake creates a Makefile based on the project file.
The command make can then attempt to build an executable by following the instructions in the Makefile.[13]
The name of the executable is specified by the TARGET variable. It defaults to the name of the project.
The following transcript shows how to use qmake to build the same little program that we discussed, compiled, and ran in Example 1.1.
The files that are created after each step of the build process are italicized.
src/early-examples/example0> ls
fac.cpp
src/early-examples/example0> qmake -project
src/early-examples/example0> ls
example0.pro fac.cpp
src/early-examples/example0> cat example0.pro

TEMPLATE = app
TARGET =
DEPENDPATH += .
INCLUDEPATH += .

# Input
SOURCES += fac.cpp
src/early-examples/example0> qmake
src/early-examples/example0> ls
example0.pro fac.cpp Makefile
src/early-examples/example0> make
g++ -c -pipe -O2 -Wall -W -D_REENTRANT -DQT_NO_DEBUG -DQT_GUI_LIB
  -DQT_CORE_LIB -DQT_SHARED -I/usr/share/qt4/mkspecs/linux-g++ -I.
  -I/usr/include/qt4/QtCore -I/usr/include/qt4/QtCore
  -I/usr/include/qt4/QtGui -I/usr/include/qt4/QtGui -I/usr/include/qt4
  -I. -I. -I. -o fac.o fac.cpp
g++ -o example0 fac.o  -L/usr/lib -lQtGui -lQtCore -lpthread
src/early-examples/example0> ls
example0 example0.pro fac.cpp fac.o Makefile
src/early-examples/example0>
Notice that you can see the arguments passed to the compiler when you run make.
If any errors are encountered, you will also see them.
Now you can run this application.
src/early-examples/example0> ./example0
Factorial of: 10
The Factorial of 10 is: 3628800
src/early-examples/example0> ./example0
Factorial of: -3
No negative values, please!
Factorial of: 0
The Factorial of 0 is: 1
src/early-examples/example0>
Instead of running the compiler directly from the command-line, you should henceforth use qmake and make,
which greatly simplify the build process – especially when a project involves multiple source and header files and libraries.
Section C.1 discusses the make command and Makefiles in a bit more detail.
The project file can be thought of as a map of the project, containing references to all files and locations required for building your application or library.
Like other source code files, this is both human-readable and machine-readable.
The .pro file is the first place to look when you encounter "not found" or "undefined" messages during the build process (especially at link time).
For further details we recommend that you read Qt's guide to qmake.
As you add more source-code, header, or library modules to your project, you must edit the .pro file and add the new items to the appropriate SOURCES, HEADERS, and LIBS lists.
The same documentation standards that apply to C++ source code should be applied to project files (where comments begin with #).
In Example 1.6, you can see common qmake variable settings that can be helpful to add to all of your projects.
By placing a copy of this file in a convenient location and adding the line
include (/path/to/wherever you put/common.pri)
to your project file, you can save yourself some typing.
Example 1.6. src/common.pri
# required if you want to see qDebug() messages
CONFIG += debug

# place auto-generated files in "invisible" subdirectories
win32 {
    MOC_DIR = _moc
    UI_DIR = _ui
    OBJECTS_DIR = _obj
} else {
    UI_DIR = .ui
    MOC_DIR = .moc
    OBJECTS_DIR = .obj
}

# rules below apply to TEMPLATE=app projects only:
app {
    # place executable in same folder:
    DESTDIR=$$OUT_PWD

    # don't place executables in an app bundle on mac os
    # this also permits console apps to work on the mac
    mac {
        CONFIG -= app_bundle
    }

    # Open a console for stdin, stdout, and stderr Windows:
    win32 {
        CONFIG += console
    }
}
<include src="src/common.pri" href="src/common.pri" id="common-pri" mode="text"/>
[12] Depending on your development environment, you may find variants of make, such as mingw32-make, gmake, or cmake. In MS Dev Studio, you'll find nmake.
[13] To produce a Makefile in MacOSX, you need to add the line CONFIG -= app_bundle to the project file and you need to type qmake -spec macx-g++ instead of just qmake.
| Generated: 2012-03-02 | © 2012 Alan Ezust and Paul Ezust. |
| |  | |
| 1.5.1. Exercises: Introduction to Functions |  | 1.6.1.
#include: Finding Header Files |
![[Note]](png/note-3.png)