| 1.11. Qt Dialogs for User Input/Output | ||
|---|---|---|
 |
Chapter 1. C++ Introduction |  |
| 1.11. Qt Dialogs for User Input/Output | ||
|---|---|---|
| |
Chapter 1. C++ Introduction | |
[ fromfile: qtfirstapp.xml id: qtfirstapp ]
Example 1.15 shows a rewrite of the first C++ example, using standard Qt dialogs instead of standard input/output and QString instead of Standard Library strings. We include this example here, even though the code contains a few things that have not been discussed yet so that you can see another way to ask for input and present output, using Qt GUI convenience functions.
Example 1.15. src/early-examples/example1/fac1.cpp
#include <QtGui>
int main (int argc, char* argv[]) {  QApplication app(argc, argv);
  QTextStream cout(stdout);
  // Declarations of variables
int answer = 0;
// Declarations of variables
int answer = 0;  do {
// local variables to the loop:
int factArg = 0;
int fact(1);
factArg = QInputDialog::getInt(0, "Factorial Calculator",
"Factorial of:", 1);
do {
// local variables to the loop:
int factArg = 0;
int fact(1);
factArg = QInputDialog::getInt(0, "Factorial Calculator",
"Factorial of:", 1);  cout << "User entered: " << factArg << endl;
int i=2;
while (i <= factArg) {
fact = fact * i;
++i;
}
QString response = QString("The factorial of %1 is %2.\n%3")
.arg(factArg).arg(fact)
cout << "User entered: " << factArg << endl;
int i=2;
while (i <= factArg) {
fact = fact * i;
++i;
}
QString response = QString("The factorial of %1 is %2.\n%3")
.arg(factArg).arg(fact)  .arg("Compute another factorial?");
  answer = QMessageBox::question(0, "Play again?", response,
QMessageBox::Yes | QMessageBox::No);
answer = QMessageBox::question(0, "Play again?", response,
QMessageBox::Yes | QMessageBox::No);  } while (answer == QMessageBox::Yes);
return EXIT_SUCCESS;
}
} while (answer == QMessageBox::Yes);
return EXIT_SUCCESS;
}
|
|
Start of function "main" which returns int. |
|
|
Start of every Qt GUI application. |
|
|
Create a QTextStream to standard output. |
|
|
Must be defined outside the do loop because it is used in the condition outside the do block. |
|
|
Pop up dialog, wait for user to enter an integer, return it. |
|
|
Each %n is replaced with an arg() value. |
|
|
Long statements can continue on multiple lines, as long as they are broken on token boundaries. |
|
|
Bitwise or of two values. |
This program makes use of the Qt types (classes) listed next.
QApplication – A single object that needs to exist in Qt GUI applications.
QInputDialog – For asking questions of the user.
QMessageBox – For sending responses back to the user.
QString – A unicode string
class. This example uses the powerful QString
function arg(), which enables you to format parameterized values (%1, %2, etc.)
into the string.
QTextStream – For streaming
to/from text files. In this example, we defined a variable called cout that
goes to the same place (stdout) as the iostream
cout from the C++ standard library. If you intend to get user input from
dialogs and other widgets, there is no need for cin anymore.
The code in Example 1.15 contains items discussed in the next few chapters:
Command-line arguments (argc and argv) – Section 1.13.1
Classes and scope resolution operators (::) – Section 2.2
Static member functions Section 2.9
Pointers – Section 1.15
Optional arguments – Section 5.2
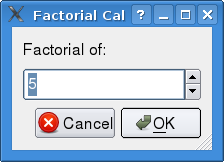
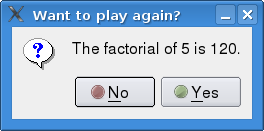
When you run this application, you first see an input dialog like Figure 1.2.
The input "widget" inside the dialog box is called a spin box and is implemented as QSpinBox. It displays the current value and, if the user clicks on the up or down button located at the right end of the display space, it displays other acceptable choices. The user could also press the up or down arrow key. The implementation is flexible and can easily be customized (e.g., by specifying the minimum and maximum acceptable values). After the user enters a number and clicks OK, the dialog box is replaced with a QMessageBox that pops up with the calculated result.
Any application that uses Qt classes needs a project file. Recall that a project file describes the project by listing all of the files and all of the options and file locations that are needed to build the project. Because this is a simple application, the project file is also quite simple, as shown in Example 1.16.
Example 1.16. src/early-examples/example1/example1.pro
TEMPLATE = app
include (../../common.pri)
SOURCES += fac1.cpp
The first line,
TEMPLATE = app, indicates that qmake should start with a
templated Makefile suited for building applications.
If this project file were for a library, you would see TEMPLATE = lib to indicate
that a Makefile library template should be used instead.
A third possibility is that you might have your source code distributed among several subdirectories, each having
its own project file.
In such a case you might see TEMPLATE = subdirs in the project file located in the
parent directory, which would cause a Makefile to be produced in the parent directory
and also in each subdirectory.
The second line includes the optional common project settings from Example 1.6.
Finally, the source file is listed in SOURCES.
| Generated: 2012-03-02 | © 2012 Alan Ezust and Paul Ezust. |
| |
 |
|
| 1.10.1. Exercises: File Streams |  |
1.11.1. Exercises: Qt Dialogs for User Input/Output |