| 13.2.2. Multiple Views | ||
|---|---|---|
 |
13.2. Qt Models and Views | 
|
| 13.2.2. Multiple Views | ||
|---|---|---|
| |
13.2. Qt Models and Views |
|
[ fromfile: qtmodelview.xml id: multipleviews ]
Example 13.2, is a function that creates a QStandardItemModel that can be viewed as a tree, a table, or a simple list. This function also demonstrates the use of QStandardItem.
Example 13.2. src/modelview/multiview/createModel.cpp
#include <QtGui> QStandardItemModel* createModel(QObject* parent, int rows, int cols, int childNodes) { QStandardItemModel* model = new QStandardItemModel(rows, cols, parent); for( int r=0; r<rows; r++ ) for( int c=0; c<cols; c++) { QStandardItem* item = new QStandardItem( QString("Row:%0, Column:%1").arg(r).arg(c) ); if( c == 0 )for( int i=0; i<childNodes; i++ ) { QStandardItem* child = new QStandardItem( QString("Item %0").arg(i) ); item->appendRow( child ); } model->setItem(r, c, item); } model->setHorizontalHeaderItem( 0, new QStandardItem( "Name" )); model->setHorizontalHeaderItem( 1, new QStandardItem( "Value" ) ); return model; }
|
|
Add child nodes to elements in the first column |
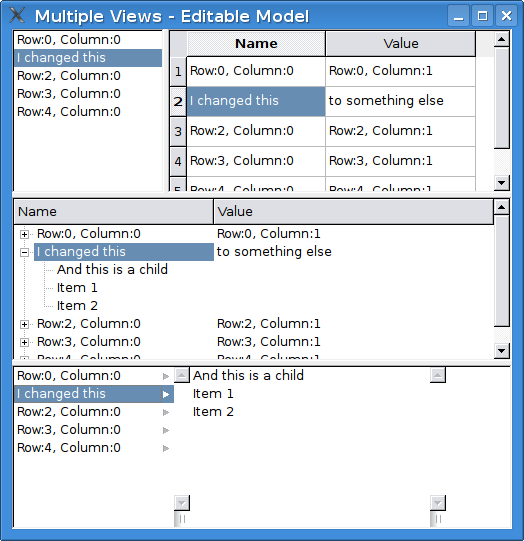
The main program, shown in Example 13.3, creates four different views: QListView, QTableView, QTreeView, and QColumnView. Notice that the QTableView and QListView do not display child nodes. In addition, the QColumnView and QListView do not display the table model's columns beyond column 0. The QColumnView displays tree children of selected nodes in the column to the right, similar to the way that the MacOS X Finder displays files in a selected folder.
All views share the same model, so edits in a cell are immediately visible in the other views. In addition, all views share a selection model so that selections happen simultaneously in all four views.
Example 13.3. src/modelview/multiview/multiview.cpp
[ . . . . ]
#include "createModel.h"
int main( int argc, char** argv ) {
QApplication app( argc, argv );
QStandardItemModel* model = createModel(&app);
QSplitter vsplitter(Qt::Vertical);
QSplitter hsplitter;
QListView list;
QTableView table;
QTreeView tree;
QColumnView columnView;
[ . . . . ]
list.setModel( model );
table.setModel( model );
tree.setModel( model );  columnView.setModel (model);
[ . . . . ]
list.setSelectionModel( tree.selectionModel() );
table.setSelectionModel( tree.selectionModel() );
columnView.setModel (model);
[ . . . . ]
list.setSelectionModel( tree.selectionModel() );
table.setSelectionModel( tree.selectionModel() );  columnView.setSelectionModel (tree.selectionModel());
table.setSelectionBehavior( QAbstractItemView::SelectRows );
table.setSelectionMode( QAbstractItemView::SingleSelection );
columnView.setSelectionModel (tree.selectionModel());
table.setSelectionBehavior( QAbstractItemView::SelectRows );
table.setSelectionMode( QAbstractItemView::SingleSelection );
|
|
By default, children layout horizontally. |
|
|
Share the same model. |
|
|
Common selection model. |
When you run this code, you should see a window similar to Figure 13.6. Notice that selecting an item from one of the views causes selection to occur in the others. Because we use the concrete QStandardItemModel, items are editable from any of the views. Furthermore, changes from any view are automatically propagated to the other views, thus ensuring that each view is consistent with the model.
You can trigger an edit via the F2 key, a double-click, or
by simply entering the cell, depending on how QAbstractItemView::EditTriggers
has been set.
You might notice that other keyboard shortcuts (cut, copy, paste, ctrl+cursor keys, and so on) familiar from your
native window environment will also work inside these views and text areas.
For this application we made use of QSplitter widgets. A QSplitter has some of the features of a layout, but the widgets that it manages are its children. Splitters permit the user to resize the subspaces that contain child widgets at runtime by dragging the boundary between them. Here is the code that sets up the splitter widgets.
Example 13.4. src/modelview/multiview/multiview.cpp
[ . . . . ]

  hsplitter.addWidget( &list );
  hsplitter.addWidget( &table );
  vsplitter.addWidget( &hsplitter );
  vsplitter.addWidget ( &tree );
  vsplitter.addWidget ( &columnView );

  vsplitter.setGeometry(300, 300, 500, 500);
  vsplitter.setWindowTitle("Multiple Views - Editable Model");
| Generated: 2012-03-02 | © 2012 Alan Ezust and Paul Ezust. |
| |

|
|
| 13.2.1. QFileSystemModel |  |
13.2.3. Delegate Classes |