| 9.6. Layout of Widgets | ||
|---|---|---|

|
Chapter 9. Widgets and Designer | 
|
| 9.6. Layout of Widgets | ||
|---|---|---|
|
|
Chapter 9. Widgets and Designer |
|
[ fromfile: layout.xml id: layout ]
A widget can be popped up on the screen, like a dialog, or it can be made a part of a larger window. Whenever you must want to arrange smaller widgets inside larger ones, you must use layouts. A layout is an object that belongs to (i.e., is a child of) exactly one widget. Its sole responsibility is to organize the space occupied by its owner's child widgets.
Although each widget has a setGeometry() function that enables you to set its size
and position, absolute sizing and positioning are rarely used in a windowing application because they impose an
undesirable rigidity on the design.
Proportional resizing, splitters, scrollbars when needed, and flexible arrangement of visual space are all
achieved quite naturally through the use of layouts.
The process of specifying the way that your widgets display on the screen consists of dividing the screen into regions, each controlled by a QLayout. Layouts can arrange their widgets
Vertically (QVBoxLayout)
Horizontally (QHBoxLayout)
In a grid (QGridLayout)
In a form (QFormLayout)
In a stack where only one widget is visible at any time (QStackedLayout)
Widgets are added to QLayouts
using the addWidget() function.
When a widget is added to a layout, it becomes the child of the widget that owns the layout.
A widget can never be the child of a layout.
Layouts are not widgets and have no visual representation. Qt supplies an abstract base class named QLayout plus several QLayout subclasses: QBoxLayout (particularized to QHBoxLayout and QVBoxLayout), QGridLayout, and QStackedLayout. Each of the layout types has an appropriate set of functions to control the spacing, sizing, alignment, and access to its widgets.
For its geometry management to work, each QLayout object must have a parent that is either a QWidget or another QLayout. The parent of a QLayout can be specified when the layout is constructed by passing the constructor a pointer to the parent widget or layout. It is also possible to construct a QLayout without specifying its parent, in which case you can call QWidget::addLayout() at some later time.
Layouts can have child layouts.
Layouts can be added as a sublayouts to another by calling addLayout().
The exact signature depends on the kind of layout used.
If the parent of a layout is a widget, that widget cannot be
the parent of any other layout.
The CardTable class defined in Example 9.6 reuses libcards2, for easy access to QImages
of playing cards (see Section
9.5).
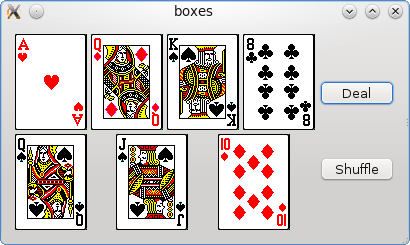
Constructing a CardTable object puts Figure 9.12 on the screen.
Example 9.6. src/layouts/boxes/cardtable.h
CardTable is implemented in Example 9.7 by constructing a QLabel
for each image.
This implementation demonstrates some simple but useful layout techniques.
Example 9.7. src/layouts/boxes/cardtable.cpp
[ . . . . ] CardTable::CardTable(QWidget* parent) : QWidget(parent) { QHBoxLayout* row = new QHBoxLayout();row->addWidget(new Card("ah"));
row->addWidget(new Card("qd")); row->addWidget(new Card("ks")); row->addWidget(new Card("8c")); QVBoxLayout* rows = new QVBoxLayout();
rows->addLayout(row);
row = new QHBoxLayout();
row->addWidget(new Card("qs")); row->addWidget(new Card("js")); row->addWidget(new Card("td")); rows->addLayout(row);
QVBoxLayout* buttons = new QVBoxLayout();
buttons->addWidget(new QPushButton("Deal")); buttons->addWidget(new QPushButton("Shuffle")); QHBoxLayout* cols = new QHBoxLayout();
setLayout(cols);
cols->addLayout(rows);
cols->addLayout(buttons);
} [ . . . . ]
|
|
First row |
|
|
Parents are set by layout, so we don't have to. |
|
|
Lay out rows vertically. |
|
|
Nest a row in the vertical layout. |
|
|
Second row |
|
|
Nesting again |
|
|
A column for the buttons |
|
|
Bring them all together. |
|
|
The "root layout" for this widget |
|
|
Add both card rows as a column. |
|
|
Add column of buttons as another column. |
The client code shown in Example 9.8 suffices to put the window on the screen.
Example 9.8. src/layouts/boxes/boxes.cpp
#include <QApplication>
#include "cardtable.h"

int main(int argc, char* argv[]) {
	QApplication app (argc, argv);
	CardTable ct;
	ct.show();
	return app.exec();
}
If you build and run this example and use your mouse to resize the window, you notice that the width of the buttons stretches first to gobble up extra space, but that there is also stretchable spacing between the cards and between the buttons. If you remove the buttons and resize, you can see that the horizontal spacing between the cards grows evenly and uniformly.
| Generated: 2012-03-02 | © 2012 Alan Ezust and Paul Ezust. |
|
|
 |
|
| 9.5. Icons, Images and Resources |  |
9.6.1. Spacing, Stretching, and Struts |