| 9.4. Form Layout | ||
|---|---|---|

|
Chapter 9. Widgets and Designer | 
|
| 9.4. Form Layout | ||
|---|---|---|
|
|
Chapter 9. Widgets and Designer |
|
[ fromfile: formlayout.xml id: formlayout ]
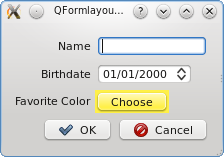
Sometimes, you need to create your own dialogs with custom input fields. The dialog shown in Figure 9.10 shows a QFormLayout inside a QVBoxLayout. It gets a QString, QDate, and QColor from the user. You can use objects of type QLayout to organize widgets into grids, nested rows or columns, or forms.
The QFormLayout class is meant to
simplify the creation of forms, manually or from Designer.
It creates two columns, one for fixed-size labels and the other for variable-size input widgets.
Following is the class definition for InputForm.
Example 9.2. src/layouts/form/inputform.h
#ifndef INPUTFORM_H
#define INPUTFORM_H

#include <QDialog>
class QLineEdit;
class QDateEdit;
class QPushButton;
class QDialogButtonBox;

class InputForm : public QDialog {
    Q_OBJECT
public:
    explicit InputForm(QWidget* parent = 0);
    void updateUi();
protected slots:
    void accept();
    void chooseColor();
private:
    QColor m_color;
    QLineEdit* m_name;
    QDateEdit* m_birthday;
    QPushButton* m_colorButton;
    QDialogButtonBox* m_buttons;
};

#endif // INPUTFORM_H
Example 9.3 displays some lines from the InputForm
constructor.
Each call to addRow() adds an input widget and its corresponding QLabel to the layout in one line of
code.
It is not necessary to explicitly construct the QLabels.
Example 9.3. src/layouts/form/inputform.cpp
[ . . . . ]
m_name = new QLineEdit;
m_birthday = new QDateEdit;
m_birthday->setDisplayFormat("dd/MM/yyyy");
m_colorButton = new QPushButton(tr("Choose"));
m_colorButton->setAutoFillBackground(true);
m_buttons = new QDialogButtonBox(QDialogButtonBox::Ok |
QDialogButtonBox::Cancel);
QVBoxLayout* vbox = new QVBoxLayout;
QFormLayout* layout = new QFormLayout;
layout->addRow(tr("Name"), m_name);  layout->addRow(tr("Birthdate"), m_birthday);
layout->addRow(tr("Favorite Color"), m_colorButton);
vbox->addLayout(layout);
layout->addRow(tr("Birthdate"), m_birthday);
layout->addRow(tr("Favorite Color"), m_colorButton);
vbox->addLayout(layout);  vbox->addWidget(m_buttons);
Q_ASSERT(vbox->parent() == 0);
Q_ASSERT(m_birthday->parent() == 0);
setLayout(vbox);
vbox->addWidget(m_buttons);
Q_ASSERT(vbox->parent() == 0);
Q_ASSERT(m_birthday->parent() == 0);
setLayout(vbox);  Q_ASSERT(vbox->parent() == this);
Q_ASSERT(m_birthday->parent() == this);
Q_ASSERT(vbox->parent() == this);
Q_ASSERT(m_birthday->parent() == this);
|
|
Create/add a QLabel and the input widget in one line. |
|
|
This is how we nest one layout in another. |
|
|
Reparents previously laid-out widgets. |
You can use a QDialogButtonBox for presenting the standard buttons to a user. This guarantees that they show up in the same order every time. It also makes it possible for the dialogs to show up in different places on different platforms, depending on the style and dimensions of the screen.
It was not necessary to set the parents of the various widgets in the form.
They were all added to various layouts that form a component tree with vbox as the
root.
The call setLayout(vbox) sets the parent of vbox to the
host InputForm object.
It also reparents all QWidgets
that were added to the various sublayouts of vbox to the parent of vbox (once again, the host InputForm).
The Q_ASSERTs above and below that statement verify this.
| Generated: 2012-03-02 | © 2012 Alan Ezust and Paul Ezust. |
|
|
 |
|
| 9.3. Dialogs |  |
9.5. Icons, Images and Resources |