
Configuring Qt Creator for Yocto Development
In previous blog posts I've covered how to configure Qt Creator for development on Linux (1), Windows (2) and MacOS (3) desktop systems and for embedded development on the Raspberry Pi (4).
We're often asked in our training classes and consulting projects how to set up the Qt Creator IDE for embedded development using the Yocto (5) framework.
In this post I'll discuss how to do this, including instructions covering how to build a Yocto toolchain with Qt if you don't already have one from your hardware vendor.
Prerequisites
Development for Yocto is normally done on a Linux desktop. The examples here were done on Ubuntu Linux 16.04.2 LTS. The process would be similar on other desktop Linux distributions.
The assumption is that you already have a toolchain/SDK with support for Qt. You may have built it yourself or obtained it from your hardware or software vendor. If you don't already have a toolchain or have a particular hardware platform in mind, you can build one for the Yocto simulator. As an appendix to this blog post I've included brief instructions on how to build a Yocto image for the ARM-based emulator that includes Qt 5, as well as how to build a toolchain.
I also assume you have a working Qt Creator, probably already set up for a desktop version of Qt. The steps and screenshots in this post will be based on the the most recent version of Qt Creator at the time of writing, 4.3.0 RC1.
I should note that the instructions here are for a generic Yocto system. If you are using the commercial Qt For Device Creation and The Qt Company's Yocto-based boot2qt embedded Linux, the steps may be a little different and you should refer to the Qt For Device Creation documentation for details on how to build and deploy it.
Configuration
To set up Qt Creator for our Yocto toolchain, we need to do the following:
- Set up the device.
- Add the cross-compiler.
- Add the debugger.
- Add the Qt version.
- Add a kit.
- Configure the project.
Set Up the Device
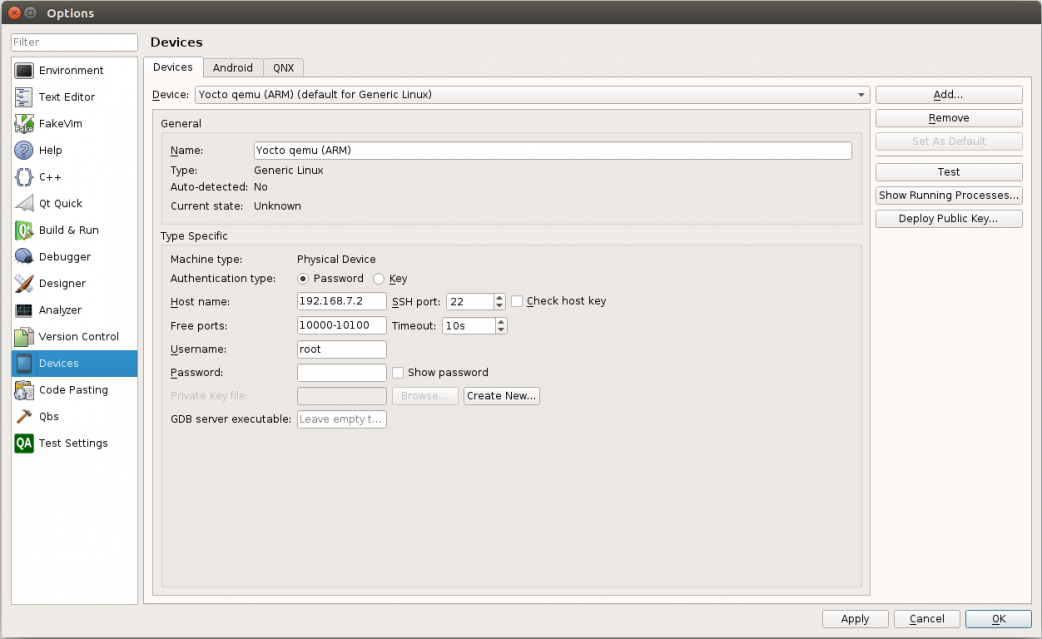
We need to set up our embedded system as a device. In my case it will be the Yocto emulator. To do this Select Tools/Options... and Click on the Devices tab. Click Add..., select Generic Linux Device then Start Wizard. Give the device a name, enter the hostname or network IP address, and login credentials. Select Next and then Finish.
Qt Creator will test connectivity with the device, so you should have it up and running when you do this, if possible. The settings I used for the Yocto emulator are shown below:
Add the Cross-Compiler
Now we need to add our cross-compiler. In the Tools/Options screen, click on the Build & Run tab. Then click on the Compilers tab.
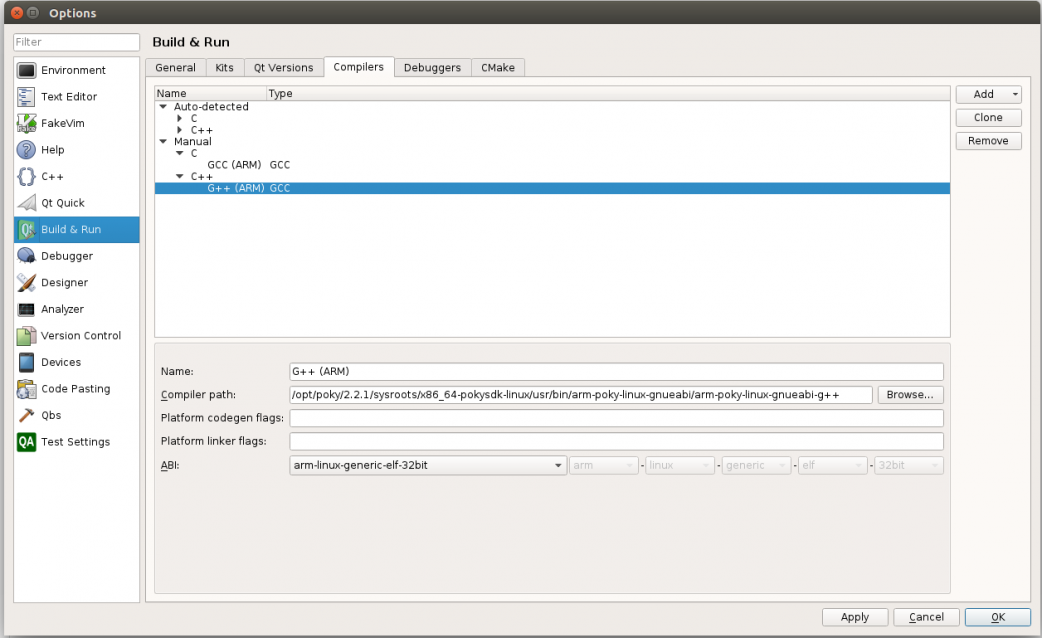
You'll probably see one or more compilers already there for native development. We add the Yocto cross-compiler by clicking on Add / GCC / C++. Give it a suitable name and enter the path to the cross-compiler. For the Yocto SDK I was using, the settings are shown below:
If you might be doing development in C (maybe to cross-compile some third party code), you might want to also set up a C compiler. If so, select Add / GCC / C and enter the path to the appropriate version of gcc from your SDK.
Add the Debugger
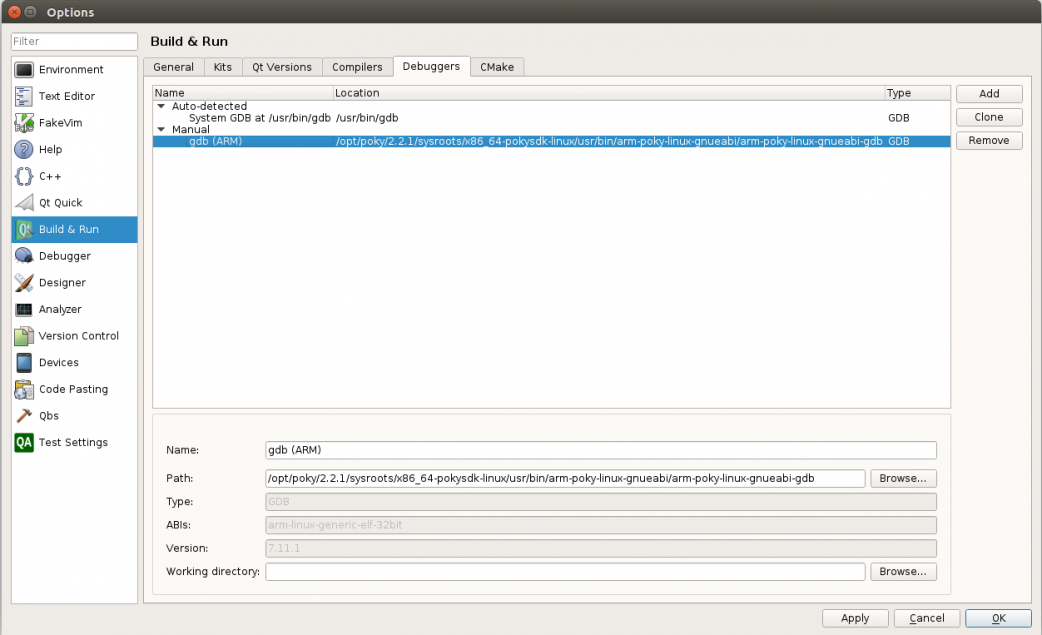
I won't cover debugging and other tools in this blog post, but in order to debug we need to add a suitable debugger. Click on the Debuggers tab, click on Add, and enter the name and path to your cross-debugger. The settings I used are shown below:
Add the Qt Version
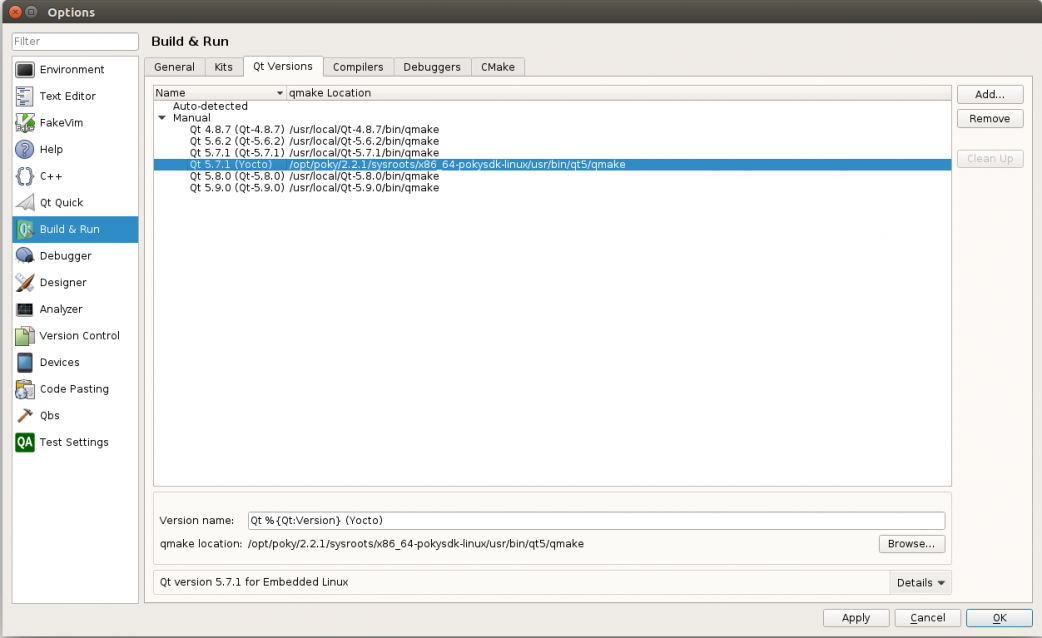
Next we add the Qt version supplied by the Yocto SDK. Click on the Qt Versions tab and then Add... Navigate to the qmake binary from your SDK. In my case it was /opt/poky/2.2.1/sysroots/x86_64-pokysdk-linux/usr/bin/qt5/qmake, as shown below:
Configure a Kit
The last step is to configure a "kit" which brings together a device, compiler, debugger, and Qt version. Click on the Kits tab and then Add. Pick a suitable name and select the device type and device. Enter the sysroot for your toolchain, the C++ and C compilers you defined earlier, as well as the debugger and Qt version. My kit settings are shown below:
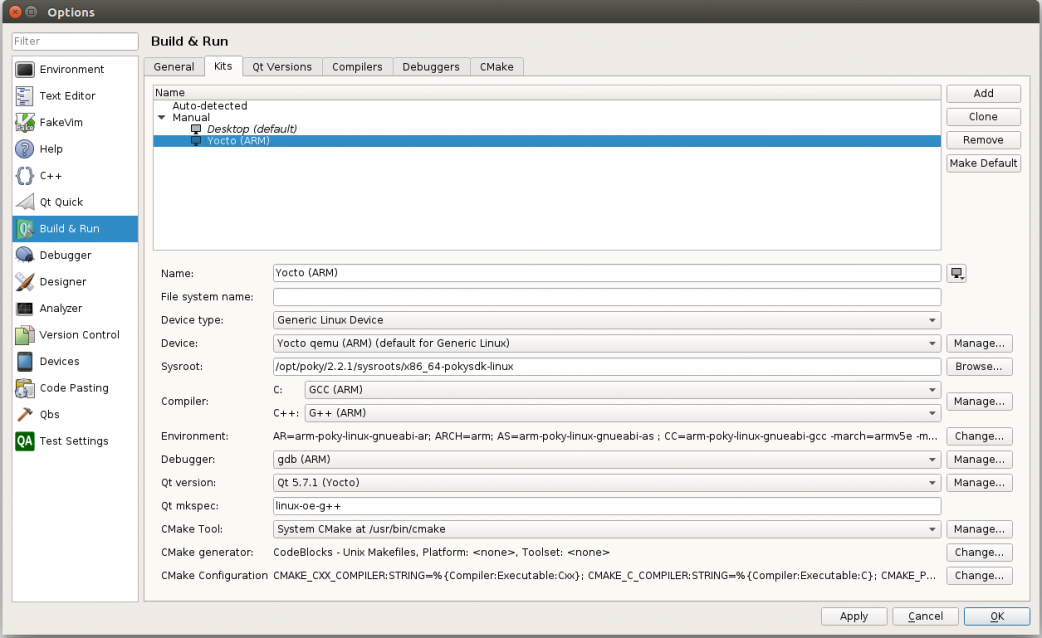
2020 update: There is an error in the screenshot above. The sysroot in the kit should be set to the ARM sysroot and not the x86 sysroot, i.e. the Sysroot: value should be /opt/poky/2.2.1/sysroots/x86_64-pokysdk-linux rather than /opt/poky/2.2.1/sysroots/armv5e-poky-linux-gnueabi. Having it be incorrect doesn't seem to bother the actual build, but in recent versions of Qt Creator (since this blog was written) the Clang code model can't find Qt with the x86 value and shows warnings or errors in the source editor.
One quirk of Qt Creator is that it seems to always want to run qmake with the -mkspec option. I found I needed to enter a suitable value in the "Qt mkspec" field, in my case "linux-oe-g++", in order for it to generate the correct Makefile.
Set Up the Environment
We need to do one more thing. You may recall that to set up your Yocto toolchain we need to run a script that sets up the environment. That also needs to be done when using Qt Creator. We can set this up in three different ways:
- You can always start Qt Creator in the same shell/console session where you previously ran the environment setup script (i.e. /opt/poky/2.2.1/environment-setup-armv5e-poky-linux-gnueabi). This option is the easiest, but means that you can’t simply launch Qt Creator from a desktop shortcut or similar method. It might also cause problems if you want to build for the desktop or another embedded platform within the same session.
- You can add the environment variables to the kit’s settings. This option is a little more work to set up, but avoids the issues of the shell setup.
- A third option is to add the environment variables to your project settings, but that means adding it to every project that uses the kit.
In my case I determined the environment needed by running the environment script and seeing what variables it set. You can then click on Change... under Environment: for the kit and paste in the environment variables, one per line. This is what I used:
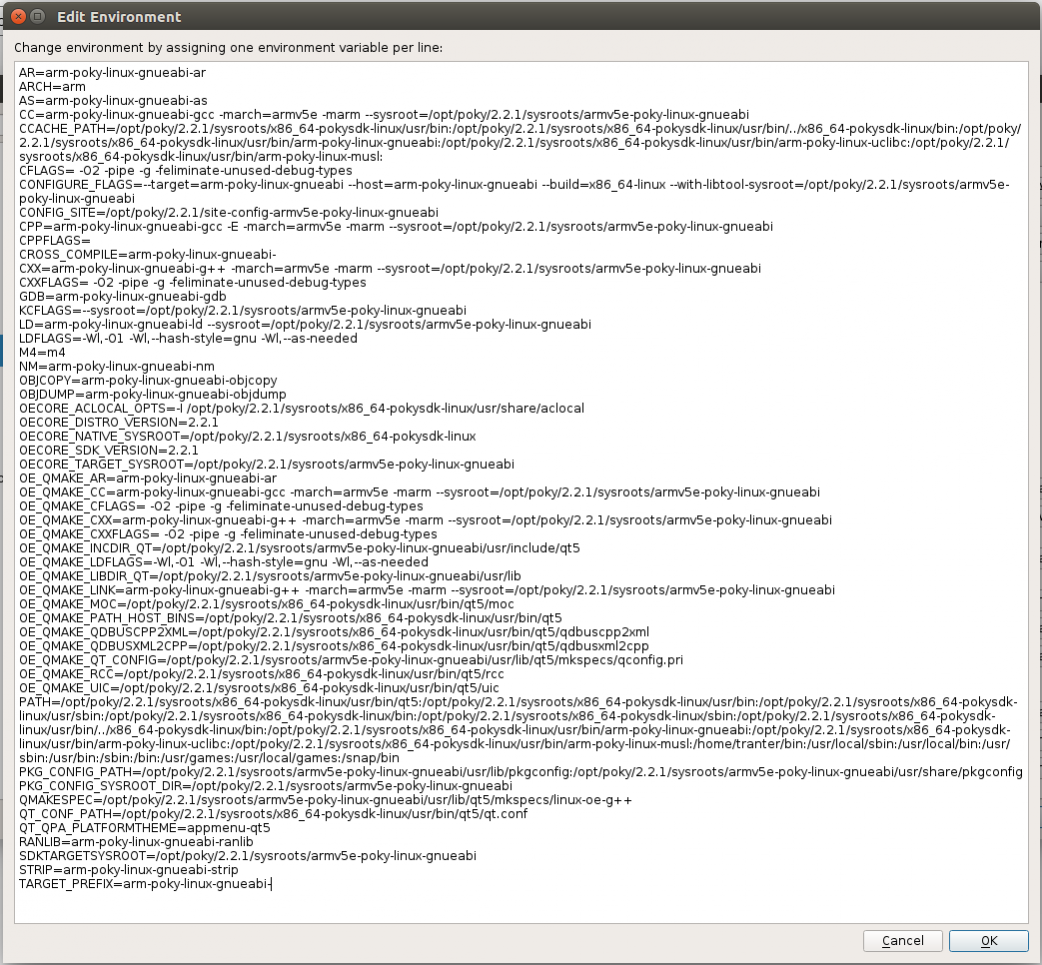
Here are the actual settings in case you want to copy and paste them:
AR=arm-poky-linux-gnueabi-ar
ARCH=arm
AS=arm-poky-linux-gnueabi-as
CC=arm-poky-linux-gnueabi-gcc -march=armv5e -marm --sysroot=/opt/poky/2.2.1/sysroots/armv5e-poky-linux-gnueabi
CCACHE_PATH=/opt/poky/2.2.1/sysroots/x86_64-pokysdk-linux/usr/bin:/opt/poky/2.2.1/sysroots/x86_64-pokysdk-linux/usr/bin/../x86_64-pokysdk-linux/bin:/opt/poky/2.2.1/sysroots/x86_64-pokysdk-linux/usr/bin/arm-poky-linux-gnueabi:/opt/poky/2.2.1/sysroots/x86_64-pokysdk-linux/usr/bin/arm-poky-linux-uclibc:/opt/poky/2.2.1/sysroots/x86_64-pokysdk-linux/usr/bin/arm-poky-linux-musl:
CFLAGS= -O2 -pipe -g -feliminate-unused-debug-types
CONFIGURE_FLAGS=--target=arm-poky-linux-gnueabi --host=arm-poky-linux-gnueabi --build=x86_64-linux --with-libtool-sysroot=/opt/poky/2.2.1/sysroots/armv5e-poky-linux-gnueabi
CONFIG_SITE=/opt/poky/2.2.1/site-config-armv5e-poky-linux-gnueabi
CPP=arm-poky-linux-gnueabi-gcc -E -march=armv5e -marm --sysroot=/opt/poky/2.2.1/sysroots/armv5e-poky-linux-gnueabi
CPPFLAGS=
CROSS_COMPILE=arm-poky-linux-gnueabi-
CXX=arm-poky-linux-gnueabi-g++ -march=armv5e -marm --sysroot=/opt/poky/2.2.1/sysroots/armv5e-poky-linux-gnueabi
CXXFLAGS= -O2 -pipe -g -feliminate-unused-debug-types
GDB=arm-poky-linux-gnueabi-gdb
KCFLAGS=--sysroot=/opt/poky/2.2.1/sysroots/armv5e-poky-linux-gnueabi
LD=arm-poky-linux-gnueabi-ld --sysroot=/opt/poky/2.2.1/sysroots/armv5e-poky-linux-gnueabi
LDFLAGS=-Wl,-O1 -Wl,--hash-style=gnu -Wl,--as-needed
M4=m4
NM=arm-poky-linux-gnueabi-nm
OBJCOPY=arm-poky-linux-gnueabi-objcopy
OBJDUMP=arm-poky-linux-gnueabi-objdump
OECORE_ACLOCAL_OPTS=-I /opt/poky/2.2.1/sysroots/x86_64-pokysdk-linux/usr/share/aclocal
OECORE_DISTRO_VERSION=2.2.1
OECORE_NATIVE_SYSROOT=/opt/poky/2.2.1/sysroots/x86_64-pokysdk-linux
OECORE_SDK_VERSION=2.2.1
OECORE_TARGET_SYSROOT=/opt/poky/2.2.1/sysroots/armv5e-poky-linux-gnueabi
OE_QMAKE_AR=arm-poky-linux-gnueabi-ar
OE_QMAKE_CC=arm-poky-linux-gnueabi-gcc -march=armv5e -marm --sysroot=/opt/poky/2.2.1/sysroots/armv5e-poky-linux-gnueabi
OE_QMAKE_CFLAGS= -O2 -pipe -g -feliminate-unused-debug-types
OE_QMAKE_CXX=arm-poky-linux-gnueabi-g++ -march=armv5e -marm --sysroot=/opt/poky/2.2.1/sysroots/armv5e-poky-linux-gnueabi
OE_QMAKE_CXXFLAGS= -O2 -pipe -g -feliminate-unused-debug-types
OE_QMAKE_INCDIR_QT=/opt/poky/2.2.1/sysroots/armv5e-poky-linux-gnueabi/usr/include/qt5
OE_QMAKE_LDFLAGS=-Wl,-O1 -Wl,--hash-style=gnu -Wl,--as-needed
OE_QMAKE_LIBDIR_QT=/opt/poky/2.2.1/sysroots/armv5e-poky-linux-gnueabi/usr/lib
OE_QMAKE_LINK=arm-poky-linux-gnueabi-g++ -march=armv5e -marm --sysroot=/opt/poky/2.2.1/sysroots/armv5e-poky-linux-gnueabi
OE_QMAKE_MOC=/opt/poky/2.2.1/sysroots/x86_64-pokysdk-linux/usr/bin/qt5/moc
OE_QMAKE_PATH_HOST_BINS=/opt/poky/2.2.1/sysroots/x86_64-pokysdk-linux/usr/bin/qt5
OE_QMAKE_QDBUSCPP2XML=/opt/poky/2.2.1/sysroots/x86_64-pokysdk-linux/usr/bin/qt5/qdbuscpp2xml
OE_QMAKE_QDBUSXML2CPP=/opt/poky/2.2.1/sysroots/x86_64-pokysdk-linux/usr/bin/qt5/qdbusxml2cpp
OE_QMAKE_QT_CONFIG=/opt/poky/2.2.1/sysroots/armv5e-poky-linux-gnueabi/usr/lib/qt5/mkspecs/qconfig.pri
OE_QMAKE_RCC=/opt/poky/2.2.1/sysroots/x86_64-pokysdk-linux/usr/bin/qt5/rcc
OE_QMAKE_UIC=/opt/poky/2.2.1/sysroots/x86_64-pokysdk-linux/usr/bin/qt5/uic
PATH=/opt/poky/2.2.1/sysroots/x86_64-pokysdk-linux/usr/bin/qt5:/opt/poky/2.2.1/sysroots/x86_64-pokysdk-linux/usr/bin:/opt/poky/2.2.1/sysroots/x86_64-pokysdk-linux/usr/sbin:/opt/poky/2.2.1/sysroots/x86_64-pokysdk-linux/bin:/opt/poky/2.2.1/sysroots/x86_64-pokysdk-linux/sbin:/opt/poky/2.2.1/sysroots/x86_64-pokysdk-linux/usr/bin/../x86_64-pokysdk-linux/bin:/opt/poky/2.2.1/sysroots/x86_64-pokysdk-linux/usr/bin/arm-poky-linux-gnueabi:/opt/poky/2.2.1/sysroots/x86_64-pokysdk-linux/usr/bin/arm-poky-linux-uclibc:/opt/poky/2.2.1/sysroots/x86_64-pokysdk-linux/usr/bin/arm-poky-linux-musl:/home/tranter/bin:/usr/local/sbin:/usr/local/bin:/usr/sbin:/usr/bin:/sbin:/bin:/usr/games:/usr/local/games:/snap/bin
PKG_CONFIG_PATH=/opt/poky/2.2.1/sysroots/armv5e-poky-linux-gnueabi/usr/lib/pkgconfig:/opt/poky/2.2.1/sysroots/armv5e-poky-linux-gnueabi/usr/share/pkgconfig
PKG_CONFIG_SYSROOT_DIR=/opt/poky/2.2.1/sysroots/armv5e-poky-linux-gnueabi
QMAKESPEC=/opt/poky/2.2.1/sysroots/armv5e-poky-linux-gnueabi/usr/lib/qt5/mkspecs/linux-oe-g++
QT_CONF_PATH=/opt/poky/2.2.1/sysroots/x86_64-pokysdk-linux/usr/bin/qt5/qt.conf
QT_QPA_PLATFORMTHEME=appmenu-qt5
RANLIB=arm-poky-linux-gnueabi-ranlib
SDKTARGETSYSROOT=/opt/poky/2.2.1/sysroots/armv5e-poky-linux-gnueabi
STRIP=arm-poky-linux-gnueabi-strip
TARGET_PREFIX=arm-poky-linux-gnueabi-
Building a Project
We should now (finally!) be able to build and run an application for our Yocto embedded target. I'll somewhat arbitrarily pick the Qt spreadsheet example application for illustration purposes. Click on the Welcome tab in Qt Creator, then click on Examples. Type "spreadsheet" into the search bar and you should see the Spreadsheet example shown. Click on it. If your Qt installation is in a write-protected location, you'll be asked to copy the project to a writable location. If so, click on Copy Project and Open, changing the default location if desired.
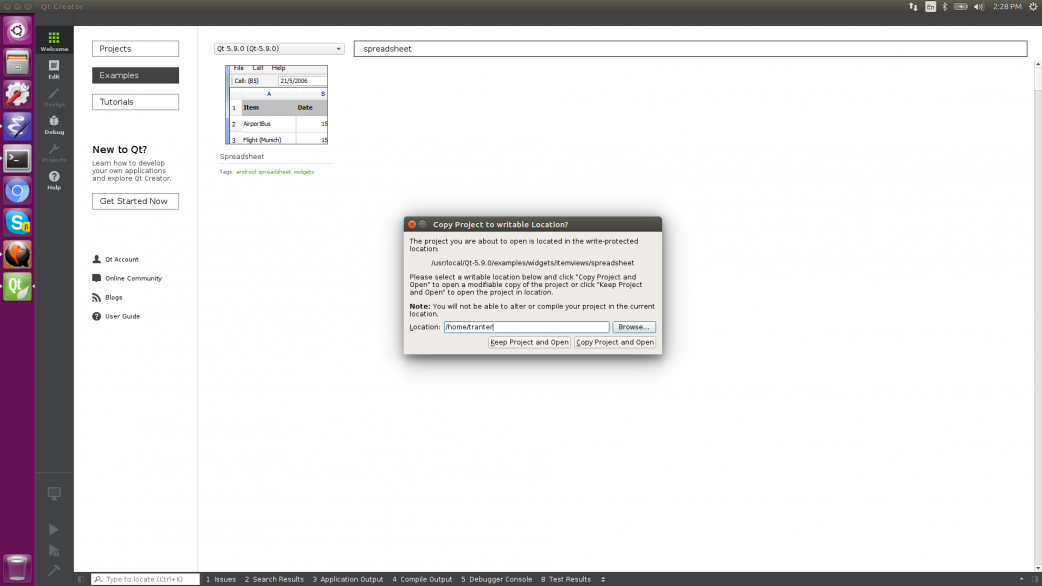
You can close the Help window which tells you about this example application. You'll now be at the Configure Project screen. Select the appropriate kit for your Yocto environment (I called mine "Yocto ARM") and click on Configure Project. You can change some of the project settings if desired, but with the defaults you should now be able to cross-compile the application by clicking on the build (hammer) icon. The Compile Output pane will show the application being cross-compiled.
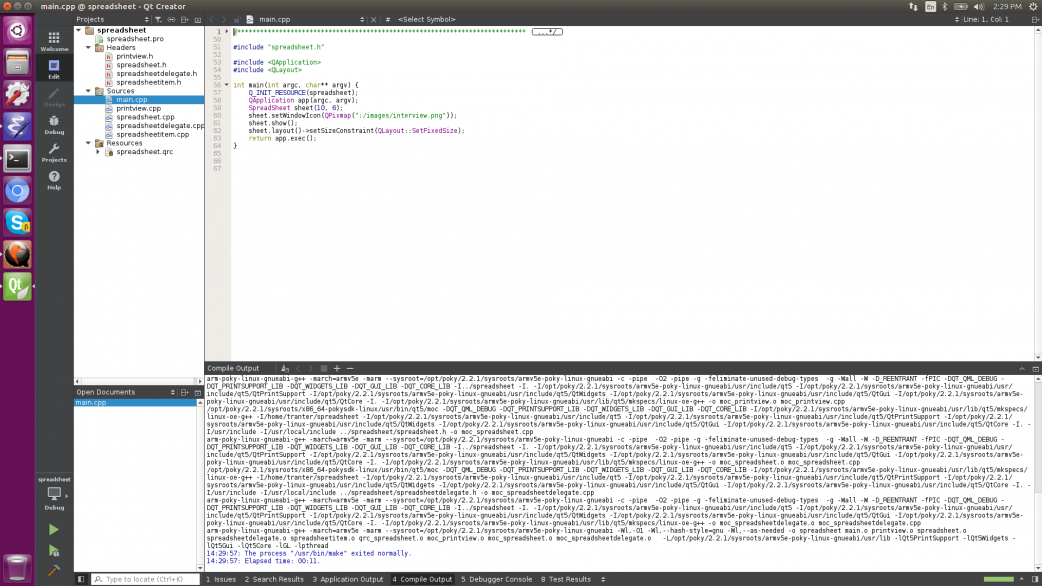
If it succeeds, start the Yocto emulator (or whatever your target system is). Click on the Run (green arrow) icon and the application should be deployed and run on the target system
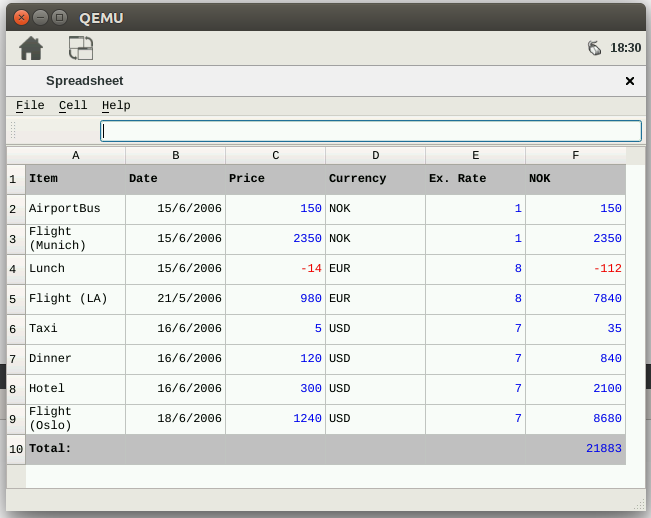
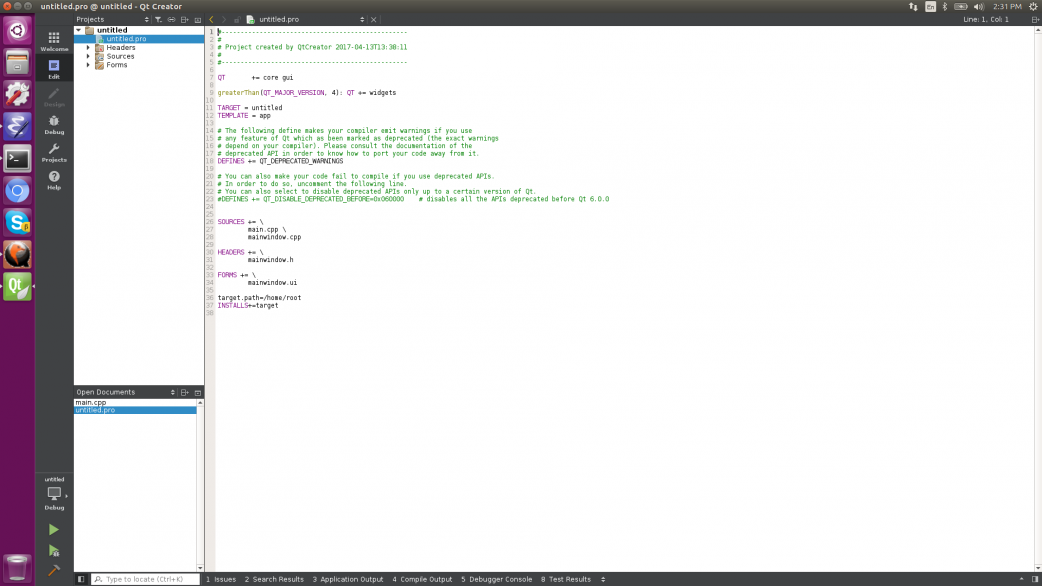
This example was a good one because it included the rules in the qmake project file to deploy the executable to the target system. If you create your own project, possibly using the New Project Wizard, the deployment rules may not be there. You can add them to your qmake project file. For the case of a simple application with only an executable file, and the Yocto emulator, these lines do the job:
# install
target.path=/home/root
INSTALLS += target
You can also configure this from the project's Run Settings if you don't want to edit the qmake project file directly.
Doing More
Typically you will want to set up additional tools for your embedded developing including the gdb debugger and performance and test tools like Valgrind and C++ and QML profilers. I may cover more of this in a future blog post.
Summary
I hope you found this short tutorial helpful. The Qt Creator IDE can greatly improve your productivity, making it easy to build, deploy and run your embedded application in much the same way you do for desktop development.
References
- Getting Started With Qt and Qt Creator on Linux, ICS blog post, http://www.ics.com/blog/getting-started-qt-and-qt-creator-linux
- Getting Started With Qt and Qt Creator on Windows, ICS blog post, http://www.ics.com/blog/getting-started-qt-and-qt-creator-windows
- Getting Started With Qt and Qt Creator on MacOS, ICS blog post, https://www.ics.com/blog/getting-started-qt-and-qt-creator-macos
- Configuring Qt Creator for the Raspberry Pi, ICS blog post, http://www.ics.com/blog/configuring-qt-creator-raspberry-pi
- Yocto Project website, https://www.yoctoproject.org
- Qt Creator Manual, Qt documentation website, https://doc.qt.io/qtcreator/index.html
- Yocto Project Quick Start, Yocto project website, https://www.yoctoproject.org/docs/2.1/yocto-project-qs/yocto-project-qs…
Appendix - Building a Qt Toolchain for Yocto under Ubuntu Linux
Here are some brief instructions on how to build a Poky Yocto image for the ARM emulator with Qt 5 as well as a Qt toolchain.
This was built on an Ubuntu 16.04.2 LTS system. It uses the Yocto "morty" release and builds Qt 5.7.1. For more details on how to build this on Ubuntu or other Linux distributions, refer to the Yocto Project Quick Start (7).
These are the shell commands I used to build it:
$ cd ~
$ mkdir yocto
$ cd yocto
$ git clone git://git.yoctoproject.org/poky
$ cd poky
$ git checkout -b morty origin/morty
$ git clone https://github.com/meta-qt5/meta-qt5.git
$ cd meta-qt5
$ git checkout -b morty origin/morty
$ cd ..
$ . oe-init-build-env
Edit the file conf/local.conf and uncomment this line near the top of the file:
MACHINE ?= "qemuarm"
Edit the file conf/bblayers.conf and add the location of meta-qt5 to the list of BBLAYERS, as listed below (use the path to your home directory):
BBLAYERS ?= " \
/home/tranter/yocto/poky/meta \
/home/tranter/yocto/poky/meta-poky \
/home/tranter/yocto/poky/meta-yocto-bsp \
/home/tranter/yocto/poky/meta-qt5 \
"
Now add the Qt packages so that they get included in the built image and we don't have to install them separately. Do this by adding the following line to the bottom of the file conf/local.conf:
IMAGE_INSTALL_append = " qt3d qt5-plugin-generic-vboxtouch qtbase qtcanvas3d qtcharts qtconnectivity qtdatavis3d qtdeclarative qtenginio qtgraphicaleffects qtimageformats qtlocation qtmultimedia qtquick1 qtquickcontrols2 qtquickcontrols qtscript qtsensors qtserialport qtsvg qtsystems qttools qttranslations qtvirtualkeyboard qtwebchannel qtwebkit-examples qtwebkit qtwebsockets qtxmlpatterns openssh-sftp-server gdb gdbserver"
Note that I added openssh-sftp-server, gdb, and gdbserver as they are needed for deployment and remote debugging from Qt Creator.
Now we can build the image. The first time you do this it could take anywhere from an hour to the better part of a day depending on the speed of your computer and Internet connection:
$ bitbake core-image-sato
Assuming it completed successfully, you can run the generated image under the emulator and see it boot up into a graphical interface:
$ runqemu qemuarm
Now we are ready to build the Qt 5 toolchain:
$ bitbake meta-toolchain-qt5
Once completed, it creates an installer script which we can run:
$ tmp/deploy/sdk/poky-glibc-x86_64-meta-toolchain-qt5-armv5e-toolchain-2.2.1.sh
Here is the typical output below:
Poky (Yocto Project Reference Distro) SDK installer version 2.2.1
=================================================================
Enter target directory for SDK (default: /opt/poky/2.2.1):
You are about to install the SDK to "/opt/poky/2.2.1". Proceed[Y/n]?
Extracting SDK..............................................................................................................................................done
Setting it up...done
SDK has been successfully set up and is ready to be used.
Each time you wish to use the SDK in a new shell session, you need to source the environment setup script e.g.
$ . /opt/poky/2.2.1/environment-setup-armv5e-poky-linux-gnueabi
Your qmake should now be the one for the toolchain:
$ which qmake
/opt/poky/2.2.1/sysroots/x86_64-pokysdk-linux/usr/bin/qt5/qmake
And you should have the ARM cross-compiler in your search path:
$ arm-poky-linux-gnueabi-g++ --version
arm-poky-linux-gnueabi-g++ (GCC) 6.2.0
Copyright (C) 2016 Free Software Foundation, Inc.
This is free software; see the source for copying conditions.  There is NO
warranty; not even for MERCHANTABILITY or FITNESS FOR A PARTICULAR PURPOSE